

ADA Checklist for Existing Facilities
 Checklist
Recreational Checklist
Checklist
Recreational Checklist
One person can conduct a survey, but it’s easier with two people. One person can take measurements and the other person can fill out the checklist and take photos.
A floor plan or sketch helps the surveyors get oriented and know how many elements, such as drinking fountains and entrances, there are and where they are. If plans are not available, sketch the layout of interior and exterior spaces.
Determine how many copies of each section of the checklist you need. For example, most facilities have more than one toilet room.
Start from site arrival points such as drop-off areas and public sidewalks and determine if there is an accessible route to an accessible entrance. If there is a parking lot or garage check for the correct number of accessible parking spaces, including van-accessible spaces. Is there an accessible route from the accessible parking spaces to an accessible entrance? Next survey the entrances. If there is an accessible entrance, determine if there are signs at inaccessible entrances directing people to the accessible entrance. Go inside and continue through the facility and the checklist.
Write on the front of each checklist where you are surveying. You may end up with six toilet room checklists. When you get back to your office you’ll want to know which one is the checklist for the first floor women’s room. If there isn’t an accessible entrance you’ll want to indicate how many steps there are and how much space is available to install a ramp or lift. This is a good time to take photographs.
When in doubt write it down. It’s better to have too much information than not enough. Even if something is in compliance it’s helpful to have exact measurements.
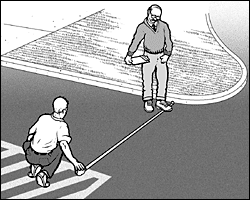
Measure from the center of marking lines. If lines are not adjacent to another space or aisle, the measurement can be to the full width of the line.

Open the door 90 degrees, measure from the face of the door to the edge of the door stop.
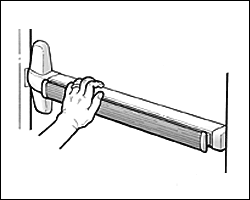
If you’re using a door pressure gauge, place it where you would push open the door.
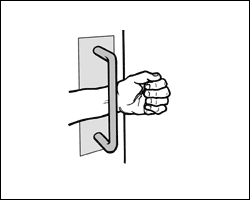
If you’re using a fish scale, place it where you would pull open the door.

You can measure slope with a 24 inch level and a tape measure. Put the level on the surface in the direction you are measuring. Put one end at the high point of the surface and raise the other end so that the bubble is in the middle of the level’s gauge. The level is now level. Measure the distance between the end of the level at its bottom point and the surface.
For a ramp the maximum running slope allowed is 1:12. That means for every inch of height change there should be at least 12 inches of ramp run. If the distance between the bottom of the level and the ramp surface is 2 inches or less, then the slope is 1:12 or less (2:24 = 1:12 and 1.5:24 = 1:16 which is a more gradual slope than 1:12). If the distance is greater than 2 inches, the ramp is too steep. For example, if the distance is 3 inches, then the slope is 1:8 (3:24 = 1:8 which is a steeper slope than 1:12).
For the parts of an accessible route that aren’t a ramp, the maximum running slope allowed is 1:20. That means for every inch of height change there must be at least 20 inches of route run. The distance from the bottom edge of the level to the surface should be no more than 1.2 inches (1.2:24 = 1:20).
For the cross slope of an accessible route the maximum slope allowed is 1:48. The distance from the bottom edge of the level to the surface should be no more than ½ inch (.5:24 = 1:48). The cross slope of an accessible route is the slope that is perpendicular to the direction of pedestrian travel.
Slopes may also be measured using a digital level. Be sure to read the instructions. Measure with the percent calculation rather than the degrees calculation. For a ramp the maximum running slope allowed is 8.33% (8.33% is a 1:12 slope). For an accessible route without a ramp the maximum running slope allowed is 5% (1:20). For the cross slope of an accessible route the maximum slope allowed is 2.083% (1:48).
Before you leave the site review all the checklists. Make sure you know which checklist goes with which entrance and which toilet room and that you’ve got all the information you need. It is better to do it now than to have to go back.
Consider the solutions listed beside each question on the checklist and add your own ideas. Consult with building contractors and equipment suppliers to estimate the costs for making modifications.
State and local governments were required to develop a Transition Plan six months after the ADA went into effect (1993!). Conducting a current survey is a good opportunity to update the plan.
Although places of public accommodation are not required to have a plan, the Department of Justice recommends one: "...Such a plan...could serve as evidence of a good faith effort to comply..."
Prioritize items, make a timeline, decide who is responsible to carry out the plan and develop a budget.
Use the 2010 ADA Standards for Accessible Design. Check whether local and state building codes require greater accessibility when alterations are undertaken.
Review the implementation plan each year to evaluate whether more access improvements have become readily achievable.